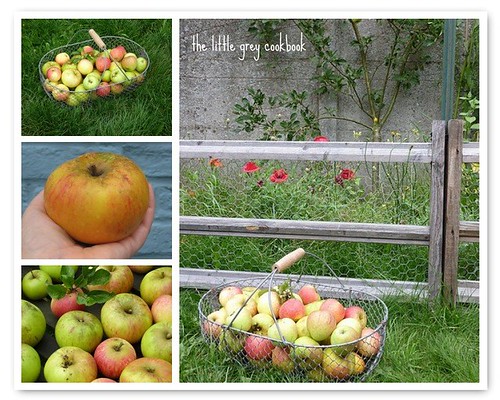
September flew by and October was here before I could say boo! .. but was it really October?
The thermometer sure didn't agree .. we were basking in upper 20Cs (upper 70Fs) and complete sunshine without a cloud in the sky. But the apples say fall. They've all been harvest .. and wow, what an improvement from last year. We had oodles, and we've received more as gifts from friends with abundant gardens: Quince, Pears, more Apples and fresh Walnuts - lovely!
So I confess .. there are no pictures .. the cake is gone. But wow, it was gorgeous - surely the best apple cake I've made in the last couple of years.
You'd like the recipe? Well that's easy, it can be found here. Yes, it's my staple carrot cake recipe. Just replace the shredded carrots for roughly chopped apples - I even leave the skin on. For seasoning this time I just used a teaspoon of ground nutmeg, but you can experiment too .. any combo of cinnamon, allspice and / or nutmeg work well. But don't over do it, I think the success this time was down to the wonderful flavor of the apples coming through without an overwhelming amount spice.
One thing that changes too is the baking time but I think even that's dependent on how juicy the apples are. My best advise is to start checking at 30-40 minutes and then every 5-8 minutes thereafter. The cake I baked to celebrate the 1st of October, my mostest favorite month took about 50 minutes.
I like to do mine in a bundt pan which does help with even baking .. plus it looks very pretty if served with a scoop of unsweetened whipped cream and a generous drizzle of the most amazing salted caramel sauce ever!
Thursday, October 6, 2011
Thursday, August 25, 2011
For Better or Worse - Roasted Tomato Sauce
It was our anniversary last week, on Thursday, we had nothing in the house and planned to go out on Saturday night but I still wanted to make a nice dinner.
We had *nothing* in the house ... except ... a bowl of very ugly tomatoes. It all looked so promising. A week earlier I had taken these photos. See those huge, multi-forking branches of big, beautiful ready-to-ripen homegrown tomatoes?
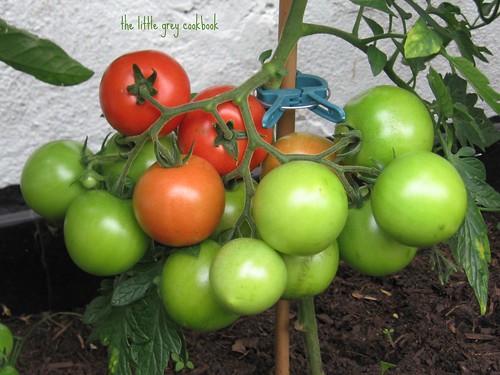
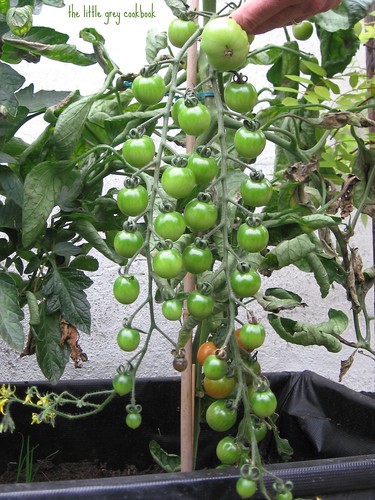
Well, a week later they looked like this! We've had a very, very rainy August and it was just too much for the dear things.
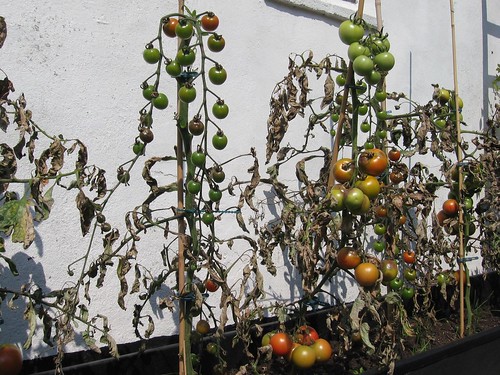
Some had ripened enough though that I was able to trim off all the bad spots, a whole bunch of garlic and a few scallions for the best ever Roasted Tomato Sauce.
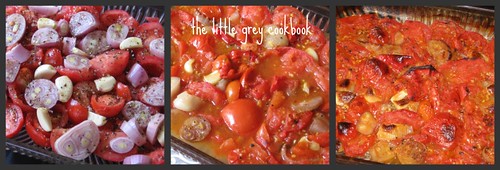
It's a breeze to make ...
We had *nothing* in the house ... except ... a bowl of very ugly tomatoes. It all looked so promising. A week earlier I had taken these photos. See those huge, multi-forking branches of big, beautiful ready-to-ripen homegrown tomatoes?


Well, a week later they looked like this! We've had a very, very rainy August and it was just too much for the dear things.

Some had ripened enough though that I was able to trim off all the bad spots, a whole bunch of garlic and a few scallions for the best ever Roasted Tomato Sauce.

It's a breeze to make ...
 |
| To spice things up just a tad, I added one. Axel is not a fan of hot but I didn't even notice it. Tonight I'm going for two and hoping for just a tiny kick. We can all use a little spicing up, right? |
- Cut tomatoes in half or quarters and squeeze out seeds (optional, the first batch I didn't, the batch I'm making for tonight I did - I think it will just make the sauce just that much smoother and more enjoyable.) Oh wait, "how many tomatoes?" you ask ... Enough that the bottom of the pan is covered. I used a 9" x 13" baking pan and it made enough sauce for four hearty servings.
- Peel and roughly slice four to five or more scallions.
- Peel as much garlic as you can stand - I probably used about 7-8 gloves and it was very garlicky but yummy good.
- Add a chili pepper if you like some heat.
- Sprinkle with freshly ground pepper and a healthy drizzling of olive oil.
- After about an hour at 200C / 400F it looks something like the middle picture, I gave it a stir and then just kept checking it every once in a while until it was starting to brown and most of the juices had evaporated.
- Blend the sauce until it is smooth, serve over warm pasta and top with grated parmesan (or in my case now that we've discovered the source of all my tummy troubles - mature goat's cheese).
Friday, August 5, 2011
Zucchini Bread or Muffins
This simple recipe makes a wonderful, moist "bread" that's not too sweet. The whole wheat flour adds a lovely nutty flavor and "healthy" color to the loaf.
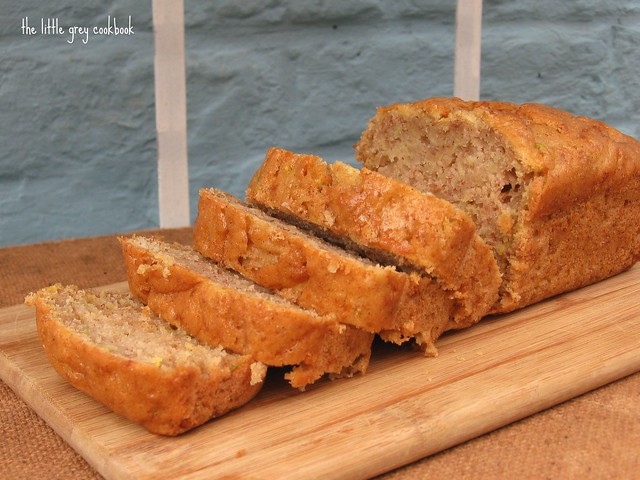 Zucchini Bread
1-1/2 Cups / 300 g sugar
1 Cup / 235ml vegetable oil
3 eggs
2 Cups / 250 g all-purpose flour
1 Cup / 140 g whole-wheat flour
1 teaspoon baking powder
1 teaspoon cinnamon
1/2 teaspoon ginger
1/2 teaspoon salt
3 cups shredded zucchini
1 Cup / 100 g chopped walnuts or pecans - optional
Cream sugar and oil together. Add eggs, one at a time, beating well after each. Add dry ingredients and mix well, the batter will be thick. Stir in zucchini
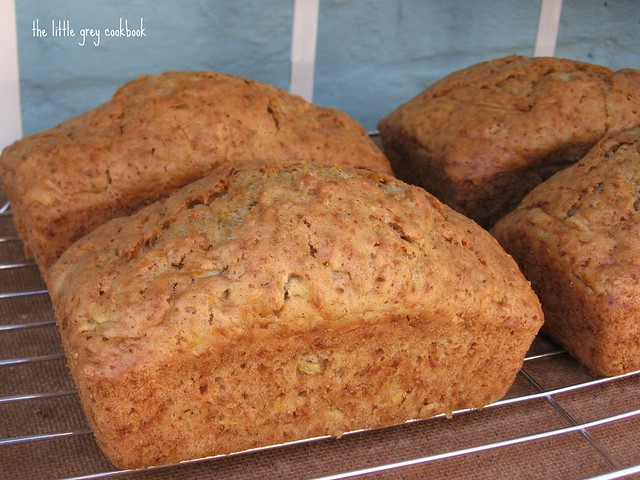 Bake at 350F / 175C for 45-55 minutes until golden brown and an inserted knife comes out clean. Cool on wire racks for 15-20 minutes before removing from pan. If baking muffins, check them at 25 minutes and monitor closely.
Makes two regular loaves or four mini loaves. I baked these in my Pampered Chef mini loaf pan and had enough batter left over for two ramekin-sized muffins.
 Zucchini Bread
1-1/2 Cups / 300 g sugar
1 Cup / 235ml vegetable oil
3 eggs
2 Cups / 250 g all-purpose flour
1 Cup / 140 g whole-wheat flour
1 teaspoon baking powder
1 teaspoon cinnamon
1/2 teaspoon ginger
1/2 teaspoon salt
3 cups shredded zucchini
1 Cup / 100 g chopped walnuts or pecans - optional
Cream sugar and oil together. Add eggs, one at a time, beating well after each. Add dry ingredients and mix well, the batter will be thick. Stir in zucchini
 Bake at 350F / 175C for 45-55 minutes until golden brown and an inserted knife comes out clean. Cool on wire racks for 15-20 minutes before removing from pan. If baking muffins, check them at 25 minutes and monitor closely.
Makes two regular loaves or four mini loaves. I baked these in my Pampered Chef mini loaf pan and had enough batter left over for two ramekin-sized muffins.
Thursday, August 4, 2011
Mock Apple Pie / Zucchini Pie / Courgette Pie
Click here to skip to the Recipe
 Call it what you like but it's good and is sure helpful when trying to use up a bountiful zucchini harvest. My mom used to make it, we all thought she was weird or at least a couple of us did. But then I was faced with her dilemna, a HUGE zucchini that just couldn't be eaten between the two of us no matter how I did the math. A few years ago, my neighbour gave me the infamous monster zucchini along with a recipe for soup which I still need to try but it was soo hot that summer that soup didn't sound good so I turned the oven on instead. Yep, who's weird now?
So I made "apple" pies and took one to my neighbours, but didn't tell them anything. Well, these lovely people have huge sweet teeth so when I asked if they liked it they just said "it wasn't so sweet." Well, I cracked and confessed that it wasn't apple pie. A week later they baked and brought me a cake ... a Bretagne Apple Tart .. hehe with whole apples in it .. there was no mistaking what kind of pie that was.
A few weeks later I made mock apple pie again and took it to a friends. The husband is a bigger apple pie freak than Axel. We served up the pie with whip cream and dug in. Eh, it was ok but not completely doing it for me. There is just something very strange about eating a pie that tastes like apple but you KNOW it's zucchini. About five minutes into his piece, we asked Andy what he thought, to which he declared "this is an apple, APPLE pie, yummm!" Axel and I nearly fell out of our chairs, offended Andy in the process and confessed again.
The impetus to nail this recipe came yesterday when I decided to make it to take along to a cooking evening with a bunch of other ladies who also harvest at our local CSA. We have an over-abundance of Courgettes (Zucchini) and Red Beets. In the course of our evening we made five different Red Beet recipes - but that's a whole other story.
In the meantime, I can report that the pie went down a success and a few ladies asked for the recipe. Normally I would happy pass on the one I used but after I started to follow it I discovered things which were just a bit wacky so I cut back on this, added that, changed another so I'm just calling this one my own and telling you how I did it.
Tongue in cheek disclaimer: I FORGOT to take a picture of the pie I made yesterday. I was stressing all day that it was going to turn into Mock Apple Flop and I completely forgot. So my pie looked different, but we just won't let that get in the way. It looked close enough.
 Call it what you like but it's good and is sure helpful when trying to use up a bountiful zucchini harvest. My mom used to make it, we all thought she was weird or at least a couple of us did. But then I was faced with her dilemna, a HUGE zucchini that just couldn't be eaten between the two of us no matter how I did the math. A few years ago, my neighbour gave me the infamous monster zucchini along with a recipe for soup which I still need to try but it was soo hot that summer that soup didn't sound good so I turned the oven on instead. Yep, who's weird now?
So I made "apple" pies and took one to my neighbours, but didn't tell them anything. Well, these lovely people have huge sweet teeth so when I asked if they liked it they just said "it wasn't so sweet." Well, I cracked and confessed that it wasn't apple pie. A week later they baked and brought me a cake ... a Bretagne Apple Tart .. hehe with whole apples in it .. there was no mistaking what kind of pie that was.
A few weeks later I made mock apple pie again and took it to a friends. The husband is a bigger apple pie freak than Axel. We served up the pie with whip cream and dug in. Eh, it was ok but not completely doing it for me. There is just something very strange about eating a pie that tastes like apple but you KNOW it's zucchini. About five minutes into his piece, we asked Andy what he thought, to which he declared "this is an apple, APPLE pie, yummm!" Axel and I nearly fell out of our chairs, offended Andy in the process and confessed again.
The impetus to nail this recipe came yesterday when I decided to make it to take along to a cooking evening with a bunch of other ladies who also harvest at our local CSA. We have an over-abundance of Courgettes (Zucchini) and Red Beets. In the course of our evening we made five different Red Beet recipes - but that's a whole other story.
In the meantime, I can report that the pie went down a success and a few ladies asked for the recipe. Normally I would happy pass on the one I used but after I started to follow it I discovered things which were just a bit wacky so I cut back on this, added that, changed another so I'm just calling this one my own and telling you how I did it.
Mock Apple Pie / Zucchini Pie / Courgette Pie
6-7 cups zucchini - peeled, seeded and chopped
3 Tablespoons lemon juice
1/8 teaspoon salt
1 Cup / 220g packed brown sugar
3 Tablespoons all-purpose flour
1 tsp cinnamon
1 teaspoon cream of tartar
One package puff/filo pastry or a prepared pie crust or your favorite pie crust recipe. Yesterday I used a puff pastry, it was lovely and I think it's firmness held the pie together very well.
Crumble topping: Cut together: 1-1/4 Cups / 150g flour, 1/3 cup / 70g sugar, 1/3 cup / 75g butter or margarine.
- Peel the zucchini, cut into quarters, cut out seeds (unless they're very young zucchini and then I don't bother) and chop into apple-pie like chunks. Toss these into a frying pan with the lemon juice and cook just until they're done and still firm enough to bite into. Pour into a sieve and allow to drain thoroughly while they're cooling.
- In a separate bowl (large enough for your zucchini later), mix together the remaining four ingredients. Add the cooked zucchini and mix well.
- Line 9-10" / 23-25cm spring-form with a pastry or the crust of your choice. Place the filling in the crust and sprinkle crumble mixture on top. If you're using a spring-form, pull the edge of the pastry away from the pan and fold down over the pie.
- Bake at 400F / 200C for about 40 minutes or until golden brown.
Tongue in cheek disclaimer: I FORGOT to take a picture of the pie I made yesterday. I was stressing all day that it was going to turn into Mock Apple Flop and I completely forgot. So my pie looked different, but we just won't let that get in the way. It looked close enough.
Tuesday, August 2, 2011
I say Zucchini, He says Courgette
I only ever remember my mom making zucchini bread or pan-frying them like this ... but without the garlic and onions. Just a splash of salt and pepper.
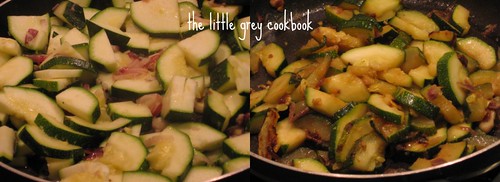

And simple still tastes the best to me. Chop on large-ish or several smalls, add a chopped red onion and a couple of gloves of garlic to a pan with a tad of butter. Don't overcook or stir them too much or they'll turn to mush.
Tonight I even left out the salt and pepper and served them with rice, white fish and a fresh tomato salad - or toe-mah-toe salad as Axel would say.
If you think speaking "one" language at home should be easy .. think again .. we have had some funny moments and some frustrating ones. We might say Tomato and Potato different but we spell it the same. If I'm looking for my purse, I better tell him it's my handbag that's missing. He keeps his purse in his back pocket while I keep my wallet in my purse.
Sunday, July 3, 2011
Cobbler
Cobbler ... of any kind works for me, but plum is my favorite and peach is just lovely.
This is my mom's recipe that I grew up on ... many many memories of yummmeeee plum cobbler made with those big fat juicy black-skinned with golden flesh plums. Plus season was always the best, after school we would go by gather up huge bowls of plums. Shaking the tree asking it to give us more, which it happily did. It was a huge tree and I couldn't even begin to guess how many bushels of plums mom would can, freeze or dry.
This recipe is plenty for a 9x13 pan. Tonight I made about 2/3 of the recipe for an oval dish that will serve the two of us nicely today and tomorrow, unless I have some for breakfast.
Put your fruit of choice in the bottom of the pan ... remove pits of course and cut into good-sized chunks. I'll confess and admit that I used canned peaches tonight. Sorry, I needed cobbler and we had *nothing* fresh in the house. This was my substitute 4th of July pie!
Mix the topping together and drop by spoonfuls onto the fruit. Mix 1/2 C sugar and 1 Tablespoon cornstarch and sprinkle over the top. Then pour over 1/4 Cup warm water. It might look strange, but trust me .. you'll get the best syrupy fruity flavor at the bottom and a lovely crunchy top ... but see that spot where you can see the dry sugar, I should have mixed that in - it was still there when I took it out of the oven.
Bake for 45 minutes at 375F / 190C.
The hole in the middle, that was me checking to see if it was done .. tonight it took over an hour to bake but I only just realized that I didn't have the oven hot enough because, yep, I did the math wrong again.
 Word of caution: allow to cool ... the hot fruit can cause terrible burns - trust me!
I don't know why, but our cobbler is always served upside down. Is yours?
This is lovely topped with vanilla ice cream, but completely unnecessary in my opinion. Happy 4th everyone!
This is my mom's recipe that I grew up on ... many many memories of yummmeeee plum cobbler made with those big fat juicy black-skinned with golden flesh plums. Plus season was always the best, after school we would go by gather up huge bowls of plums. Shaking the tree asking it to give us more, which it happily did. It was a huge tree and I couldn't even begin to guess how many bushels of plums mom would can, freeze or dry.
This recipe is plenty for a 9x13 pan. Tonight I made about 2/3 of the recipe for an oval dish that will serve the two of us nicely today and tomorrow, unless I have some for breakfast.
Put your fruit of choice in the bottom of the pan ... remove pits of course and cut into good-sized chunks. I'll confess and admit that I used canned peaches tonight. Sorry, I needed cobbler and we had *nothing* fresh in the house. This was my substitute 4th of July pie!
Cobbler Topping
3/4 Cup sugar
3 tablespoons butter
1 teaspoon baking powder
1/4 teaspoon salt
1/2 Cup milk
1 Cup flour
Mix the topping together and drop by spoonfuls onto the fruit. Mix 1/2 C sugar and 1 Tablespoon cornstarch and sprinkle over the top. Then pour over 1/4 Cup warm water. It might look strange, but trust me .. you'll get the best syrupy fruity flavor at the bottom and a lovely crunchy top ... but see that spot where you can see the dry sugar, I should have mixed that in - it was still there when I took it out of the oven.
Bake for 45 minutes at 375F / 190C.
The hole in the middle, that was me checking to see if it was done .. tonight it took over an hour to bake but I only just realized that I didn't have the oven hot enough because, yep, I did the math wrong again.
 Word of caution: allow to cool ... the hot fruit can cause terrible burns - trust me!
I don't know why, but our cobbler is always served upside down. Is yours?
This is lovely topped with vanilla ice cream, but completely unnecessary in my opinion. Happy 4th everyone!
Thursday, March 24, 2011
Chicken Cauliflower Curry
We're still working on the bathroom redecoration that turned into renovation *and* my oven quit working on Tuesday so dinner needed to be something quick and on the stove top. Easy answer: Chicken Cauliflower Curry. I originally found this recipe in one of the South Beach books but have simplified it and made it even yummier so that it's turned into one of our absolute favorite meals.
CHICKEN CAULIFLOWER CURRY
(3 - 4 servings)
 1 Tablespoon olive oil
1 medium onion
2 chicken breasts
1 head of cauliflower
salt and pepper
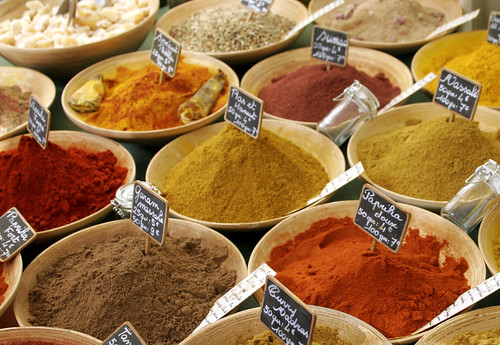
2 Tablespoons curry powder
1 teaspoon Garam Masala
1/2 teaspoon ground Cumin
1 can lowfat coconut milk
This is a quick and easy meal to prepare so I'm going to give you the instructions just as I make it.
- Warm olive oil in a large non-stick pan over medium-high heat (for me this setting is 7 out of 9).
- Meanwhile, chop the onion and add to pan.
- While the onion is turning translucent, cut the chicken into bite-size chunks.
- Salt and pepper the chicken and add to the pan.
- Toss the chicken around with the onion until it is sealed on all sides.
- While the chicken is sealing, I start chopping up the cauliflower (into the lid of my pan to save dishes) but don't forget to turn and stir the chicken every once in a while.
- Once the chicken is sealed on all sides, add the curry powder, garam masala (this adds a lovely all-spice kind of deepness to the flavor) and cumin (to give it a light and airy note) and stir the chicken around to coat.
- Allow to the spices to lightly "toast" (about 30 seconds or so) and then add the coconut milk.
- Stir the coconut into the spices and allow to warm up and simmer for about 2-3 minutes.
- Add the cauliflower and cover ... normally I reduce the heat to medium and allow the cauliflower to steam over the sauce for about 20 minutes. Tonight I forgot to reduce the heat and left it on medium-high, the cauliflower was done in 15 minutes and some of the sauce had lightly stuck to the bottom of the pan. It was ok though, when I stirred the cauliflower under to coat it with the sauce I found the sauce had lightly browned giving it a nice golden color.
So it's 4:30, dinner is ready and I've just pulled it off the heat to wait until Axel gets home about 6-ish. It will just take a few minutes to warm up and the "resting" time allows the flavors to fully penetrate.
Yummm, I can hardly wait ...
We generally eat it just as it is like a chunky stew but when we're being fancy I'll stir in a bit of unsweetened shredded coconut and / or toasted almonds and serve over rice.
Nutrition Facts | |||||||||||||||||||||||||||||||||||||||||
|
| ||||||||||||||||||||||||||||||||||||||||
Labels:
cauliflower,
chicken,
curry,
main course,
MUST.MAKE.AGAIN
Thursday, February 24, 2011
poppy seed muffins! .. or bread
I am in heaven and I won't tell you how much of this I have eaten in the last week. I baked it twice!
Axel and I have been making a list of things we are missing ... so far we've tallied up "the Kids," cherry pie, a really good chinese and a burger with the works (that's mine, not his). Funnily enough, Poppy Seed muffins missed that list ... not sure how - they were my breakfast staple along with a non-fat triple-tall latte with a hint of raspberry (or peppermint or almond) for years! Well I can promise you this fixed that with this recipe ... now if I could just solve the good home-made latte thing ...
ALMOND POPPY SEED BREAD
1-1/2 cups milk
3 eggs
1-1/2 teaspoons almond extract
1 cup vegetable oil
1-1/2 cups sugar
3 cups flour
1-1/2 teaspoons baking powder
1-1/2 teaspoons salt
2 tablespoons poppy seeds
- Preheat oven to 350F / 175F. Grease two 5"x9" loaf pans.
- Beat together milk, eggs, almond extract and oil.
- Add in sugar, flour, baking powder and salt and beat for 2 minutes. Stir in poppy seeds.
- Divide the batter evenly between the pans and bake for 45-60 minutes (depending on your oven). Remove from oven as soon as a toothpick comes out clean. For muffins you'll have to check but I'm guessing about 20-25 minutes. I like the bread because it keeps fresher and makes for a smaller portion.
- Cool in pans on a wire rack for 10 minutes, then remove from pans and cool completely.
- This freezes well if wrapped in a double layer of aluminum foil. Defrost at room temperature before serving.
So the recipe credit? Well, I changed a recipe that had been "adapted from Mary Engelbreit's Fan Fare" recipe book. For starters I cut the sugar down from 2-1/2 cups (!!!) to 1-1/2 cups. I have a firm rule about sugar and nearly always half any recipe I get ... but in my opinion the sugar should never be close to the quantity of flour - yikes! I also left out the vanilla - actually I forgot it the 2nd time and noticed no difference. I also cut back a tad on the oil and upped the poppy seeds!
Thursday, February 3, 2011
White Bean Stew with Spinach
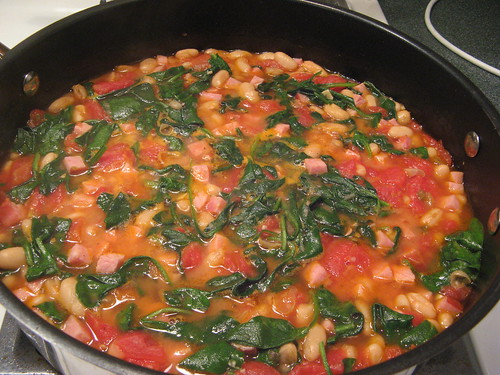 |
| PHOTO CREDIT: "White Bean Stew by jive turkey, on Flickr" |
Things I loved about this recipe:
- It's packed with vegetables.
- Beans .. I love 'em for their great source of protein.
- Spinach .. Axel loves it!
- It was very quick and easy to make.
- There's only good in it. Nothing bad, nada, nothing whatsoever.
Verdict: A+ this recipe definitely goes on our must-make-again list.
My comments regarding Smitten Kitchen's recipe:
- I pureed the tomatoes so there were no chunks - it made a lovely orange sauce when finished. Chunks would be fine, but I just didn't want them tonight ...
- Used spinach because Axel loves it! - I just heaped it on top of the stew and wilt.
- Topped with a fried (sunny-side up) egg instead of a poached one - mostly because I've never made a poached one and I used very very little olive oil to fry it.
- I did not add ham (as seen pictured above), that addition seems to be an earlier adaptation of this recipe.
- The white wine might not have been necessary ... the jury is out on this on, might try making it without (like in next time I just don't have it in the house) and see what happens.
- A sprinkle of parmesan on top of the stew would be lovely ...
Subscribe to:
Comments (Atom)
