Friday, March 28, 2014

Heavenly Pot Pie

I can't even tell you how good this was ... Delicious, sooooo yummy. It was easy to make and felt healthy. But most of all it was a meal that we could all enjoy together. With Finn's allergies we've learned to adjust recipes but I personally have been missing crusts, toppings and biscuits. Not that they feature so often on our table, but still ...

Plus, for years I have been wanting to find the perfect Chicken pot Pie recipe and this is definitely it. It is going in our forever pile of stuff to make over and over again.

Of course it helps that there are sweet potatoes in the crust ... Finn loves them. Hmmm, I wonder who he got that gene from {wink}


Chicken Pot Pie with Sweet Potato 'Crust'
adapted from Perrys Plate

I've adjusted the quantities ... this makes enough filling for 3 pies, but topping for one. Eat one pie immediately, the other two go in the freezer. Thaw completely, add topping and bake up for a heavenly and quick pot pie dinner.


INGREDIENTS

For the filling:
4 Tablespoons olive oil
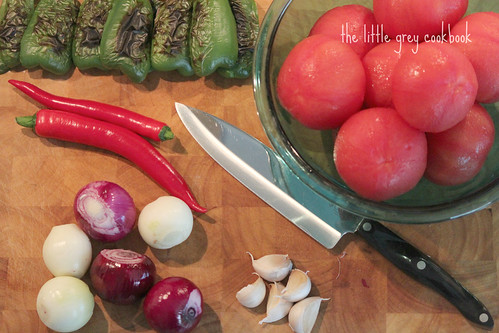
4 leeks, white and light green parts only, sliced
6 heaping Tablespoons rice flour
4 large or 6 medium carrots, peeled and diced
1 red pepper, diced
1-1/2 Cup peas (I used frozen)
Juice from baking chicken ... This time I had ½ cup
4 cups water
2 no-sodium vegetable cubes
Meat from a roasted chicken, pulled and lightly chopped up
2 teaspoon dried thyme
freshly ground black pepper

For the topping:
3/4 cup almond meal
1/2 cup Rice flour
Scant Tablespoon baking powder
1/4 teaspoon salt
2 Tablespoons cup solid coconut oil
1 egg - I used flax seed as a replacement
3/4 cup cooked, mashed sweet potatoes, chilled .. Honestly, the first time I made this it was hot from oven but it didn't seem to make a difference. Next time I'll remember to throw it in the oven when I roast the chicken.


DIRECTIONS

Preheat the oven to 400 degrees F.

To make the filling:
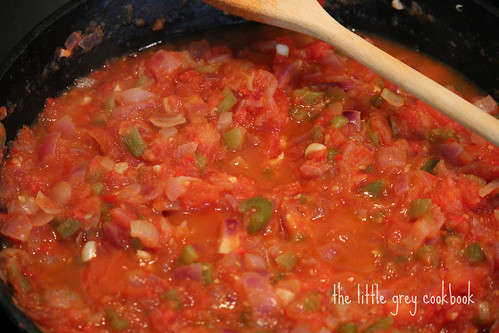
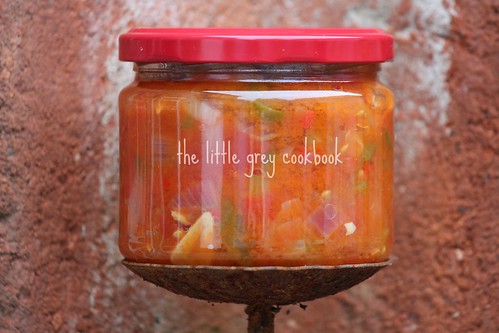
Heat oil in an oven-safe deep saute pan over medium heat. Add the leek, carrots, red pepper and peas. Add broth (from chicken), water, vegetable cube and thyme plus salt and pepper to taste. Simmer about 10 minutes until vegetables begin to soften. Whisk in rice flour and stir until thickened. Add chicken and stir to combine. Remove from the heat and cover to keep warm while you make the topping.

To make the topping:
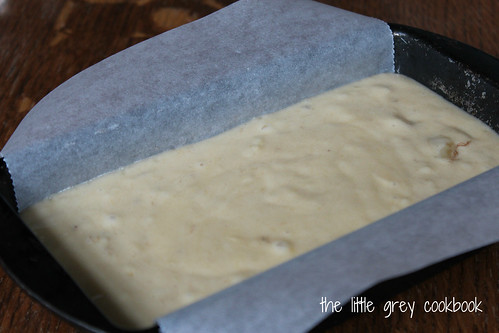
Combine the almond flour, baking powder, and salt in a food processor. Pulse to blend. Add the coconut oil in pieces, pulsing until the mixture is crumbly. Add the eggs (or presoaked flax seeds) and sweet potato and pulse until the mixture resembles a very soft dough.

Spoon and/or spread the dough on top of the chicken filling. Bake for about 30-35 minutes or until the biscuits begin to brown and are cooked through. If the tops begin to get dark quickly, place a sheet of aluminum foil over the top while it finishes baking.

Remove from oven and let it stand for a few minutes before serving.

Tuesday, August 21, 2012

Yum, SALSA!

We eat a lot of Salsa at our house. I've always loved it but it has lately grown on Axel as a quick tasty snack. We finally found a brand that we like but we go through it like crazy so I decided to try my own. This is one of the recipes I looked at to get an idea of where to start. After reading through it, it really did sound simple. I used ordinary tomatoes and added a roasted green pepper for color.

salsa ingredients
this is what went in
Ten handful-sized tomatoes (skins removed, 5 chopped, 5 pureed), one green pepper (toasted so it's easy to remove the skin), two chilies, three red and three white onions, five cloves of garlic and 1-1/2 teaspoons sea salt.

salsa in progress
done cooking and ready to go in the jars
Cut a green pepper in eights and put under the grill to blacken the skins. I just set a cookie sheet on top to trap the steam and loosen the skins while I chopped the onions and roughly squished and chopped the garlic. These I sauteed while getting the tomatoes ready. Half were chopped, the other half pureed in the blender and added to the pan. The chilis were chopped very finely and added as well along with 1-1/2 teaspoons salt. Simmer until it is the thickness you would like.

After taste testing with Leah, next time I would add another chili, use 2 teaspoons salt and simmer until all the wateriness was gone.

the finished salsa

Um, yeh, I don't think these first four jars are going to even see the water bath. Leah and I ate one, another will go into breakfast burritos for dinner tonight and I have no doubt we'll demolish the other two jars within the week.

If you've never tried making your own salsa I highly recommend it. It's really quite simple and you can play around to get the flavors you want most. Best of all no preservatives or thickeners - a big plus in my book!

Wednesday, June 13, 2012

My house smells divine!

Is there anything better than the smell of Banana Bread?

Bananas!

We had too many. They ripened too fast.

And since I still can't stand sweet there's no way Axel could eat them all on his own.

So here's my adaptation of the recipe I grew up with. Oh, and my favorite way to eat it? Warm (even toasted) with a slice of cheese. Mmmmmm!

baked banana breadBanana Bread

1/4 cup milk
1-1/2 teaspoon baking soda
3/4 cup sugar
1/2 cup vegetable oil
2 eggs
2 cups flour
1/2 teaspoon salt
3 bananas*


Directions
  1. Preheat oven to 325F / 160C
  2. Line a 5"x8" (13cm x 20cm) loaf pan crossways with baking paper.
  3. Mix the milk and baking soda together in a cup and let sit for about 10 minutes.
  4. Cream together the sugar and vegetable oil.
  5. Add in eggs one at a time and cream well.
  6. Stir in flour and milk sugar.
  7. Add mashed bananas**
  8. Bake for 45-60 minutes or until inserted knife comes out clean.

Mom's original recipe called for shortening so I've always used butter. Eureka moment this week when I used oil instead! It creates the perfect texture. Before I had always considered Banana Bread just "ok" now I might just be an addict. Yummmmmeeee!

Of course I reduced the sugar, it calls for 1 whole cup. No thank you. I find the bananas add enough sweetness.

I only had two bananas today and it was fine. I also never mash them. Just add them into the mixing bowl at the end and stir until incorporated.

naked banana breadIf you use a 5"x8" pan like I suggest it will be very full, but it makes a lovely high loaf. Trust me.

Also gone are the days of greasing and flouring pans. I just line the bottoms or go across like I did here. It works a treat and makes it easy to lift out. Just loosen the loaf at the ends and voilá!


Tuesday, June 5, 2012

Passing the Torch

Oh boy ... I do love me no bake cookiessome No-Bake Cookies and when I saw my bestie from college pin a recipe I got the hankering again. A quick glance at the recipe she pinned revealed that it was identical to the one I grew up with. Kind of nice that some recipes just stay as we remember and don't get "adapted" via via. Yep, I am fairly certain this recipe was penned into my little grey cookbook during one of those phone calls home after I had set up my own pad.

I made multiple batches of these cookies this week and gave them away as fast as I could. Axel doesn't like them (that peanut butter problem of his) and I can / could only eat so many. But ugh ... I seriously overdosed. Which probably explains why it's been three years since I made them (I know for certain I have not made them since we moved into this house).

So now it's your turn ... at least for the next three years. I think I'm good for awhile.


No-Bake Cookies

In a medium-size pan bring the following ingredients to the boil and allow to boil gently for ONE minute:
  • 1/2 cup butter (one stick)
  • 2 cups sugar*
  • 1/2 cup milk
  • 1 tsp vanilla

Meanwhile measure these things out so they're handy when that one minute is up:
  • 3 cups oats (yes, this is one time I think instant are better than rolled) 
  • 4Tbsp cocoa powder on top.
  • 3/4 cup peanut butter* (I like Adams chunky for this - trust me you do not want peanut butter that has sugar added .. these cookies are sweet enough on their own)
- I don't think my mom ever added coconut and it might be good but coconut is grated to a fine dust here so I've never bother trying.

When your timer has gone off (yes set it. I don't have one and if you go over the minute you risk the mixture getting crumbly ... they still taste good but the texture of the cookies is not as good), pull the pan away from the heat and quickly stir in the peanut butter until it's mostly combined. A few lumps are ok ... in fact sometimes it's a nice surprise ... almost like a Reece's hiding in your no-bake.

Then pour in the oats and cocoa powder and mix until combined.

Working as quickly as you can drop spoonfuls onto a baking sheet. I don't bother lining my baking sheet with aluminum foil or baking paper - it's just more waste. Instead, after they are cool, I use a twisting action to release the cookies from the pan.

DO NOT MAKE A DOUBLE BATCH ... unless you have double the hands to help you drop the cookies. The batter will cool, stiffen up and become crumbly. It's just not worth it.

* A word on sugar. Yes, whenever possible I try to reduce the amount of sugar in most recipes. This is one occasion where I have never tried. I just don't know what it would do to that boiled stuff you need to bind these cookies. But I do insist that my PB is sugar free. I borrowed some from my neighbour for the 3rd batch last week. Uck - waaaaayyy to sweet for this girl. But let me know if you have any tips / hints here.

Enjoy!


Friday, June 1, 2012

You know it's summer when ...

I start making this!

There are a couple versions of this salad around. I have really simplified it to just the core basics. You can always add more but I like it like this. I can't call it plain and simple - it packs way too much flavor for that. But easy - yes!

Woops - yah, there should be a picture .. but you can find those other versions here, here and here. Honestly I'd rather share really good recipes than worry about getting the right pic.

One version has sugar and melted butter in the dressing .. seriously? Others add chickpeas, corns, beans, etc which I think is fine but distracts from the lovely popping of the Quinoa (I'm a sucker for anything that pops in my mouth ... poppy seeds, figs ... ). And some add avocado but I don't like that it goes slimy in the fridge.

I make a ton of this salad (at least double) and then just eat away at it.

Hehe, Axel doesn't like it so it's mine, all mine! Well ... I do share with friends. It's just too good to keep it a secret.


Quinoa, Cilantro & Lime Salad

1 cup quinoa, uncooked

2 medium tomatoes, diced
3 scallions, chopped finely
1/4 cup fresh cilantro (coriander), chopped

Dressing:

the zest and lime of 1 lime
2 tablespoons olive oil
1/2 teaspoon sea salt

Directions
  1. Rinse quinoa thoroughly and add to a pot of salted water (some cook in bullion, again - I don't bother). Bring to a soft boil and let bubble away for about 10 minutes or until the little tails on the seed loosen up.
  2. Drain thoroughly and at this point I allow it to cool down.
  3. In the meantime, chop the tomatoes, scallions and cilantro.
  4. Whisk the dressing together and then toss it all in a bowl with the cooled quinoa.
  5. Refrigerate and enjoy!
I'd tell you how long it stays good in the fridge but I don't know. Mine never lasts that long.

Tuesday, May 29, 2012

Our New Favorite Cake

In fact he even requested it for his birthday instead of his former "favorite" carrot cake. But we had carrots that needed to go before we went on vacation and not a grapefruit in sight. So he had carrot cake. Mighty good it was, candles and all.

Essentially you're going to make an exquisite Yellow Cake Recipe, add zest to it, poke holes in it after it has baked and soak the top with syrup.

So ... blog reading and writing is a crazy thing. Recipe "adapting" is even crazier.

I first read about Pink Grapefruit Cake at Urban Comfort. She posted the recipe as "adapted from Ad Hoc at Home by Thomas Keller". So if I made / make changes to her posted recipe who do I credit now?  I'll play it safe and credit both and hope that's ok with all of you.  Ugh, the world of copyright and lawyers has just ruined the old days of recipe swapping.

Honestly, you can add any zest to this. Lemon, Lime, Grapefruit ... and it would be that kind of cake. But the grapefruit is amazing .. just the right amount of perfume balanced with flavor. I am going to try Lime ... but I have other recipes where I prefer Lemon and Orange.

Very Moist Yellow Cake Recipe

2 cups all-purpose flour
1 1/2 teaspoons baking powder
1 teaspoon salt
1 1/2 cups white sugar
2 large eggs - if you can get your hands on home grown - do ... the very yellow yolks will give your cake a wonderful color.
1 cup milk
3/4 cup vegetable oil of your choice
1 teaspoon pure vanilla extract
freshly grated zest*

*about the zest
grapefruit - I used the grated of one whole grapefruit - about the size of a softball.
orange - I'd use two oranges
lemon - probably 2, maybe 3 if they were small
lime - definitely 3, maybe 4

Syrup 
the juice of whatever fruit you zested**
1/2 cup granulated sugar

**how much juice?

grapefruit - all of the juice
orange - 2/3 to all
lemon - probably the juice of 2, maybe 3 if they were small
lime - again definitely 3, maybe 4

Urban Comfort says 1 cup of juice but she didn't use it all. Neither did I. I squeezed the juice of my ONE grapefruit and added the 1/2 cup of sugar to make the syrup. ❤ leftover syrup was added to sparkling water for an amazingly refreshing drink.

  1. Preheat oven to 350° F / 175°C. Line the bottom of a 9" x 9" baking pan with parchment paper and grease the sides.
  2. Sift the flour and baking powder together and stir in the salt. Set aside.
  3. Beat sugar and eggs at medium speed for about 3 minutes, until the mixture is thickened and the whisk leaves a trail. Beat in the milk, then the oil, grapefruit zest, and vanilla. Reduce the speed to low and add the flour mixture, mixing just to incorporate; scrape the sides of the bowl as needed.
  4. Spread the batter in the pan. 
  5. Bake for 45 minutes or until a cake tester or wooden skewer inserted in the center comes out with just a few moist crumbs clinging to it. Transfer the pan to a cooling rack.
  6. Meanwhile, combine the grapefruit juice and sugar in a small saucepan, bring to a simmer, stirring to dissolve the sugar, and simmer for 1 minute. Set aside. 
  7. After the cake has cooled for about 10 minutes, carefully turn the cake out onto a cooling rack and set right sides up. Use a long skewer to poke deep holes every 3/4 inch or so all over the top of the cake.
  8. Begin brushing the grapefruit syrup over the top of the cake. It may be necessary at times to wait for the syrup to soak in, but continue until you feel like it won't absorb any more. 
Let the cake cool to room temperature. Ice if desired. Easily serves 9.

    Grapefruit Icing - I skipped this ... eh, just not a fan of "icing." Buttercream frosting is another matter.
    3/4 cup powdered sugar
    1 tablespoon plus
    1 teaspoon fresh pink (or red) grapefruit juice

    Stir the powdered sugar and grapefruit juice together in a bowl until smooth. Using a spoon, drizzle the icing on a diagonal over the top of the cake, allowing it to drip down the sides. Slice the cake and serve.

    Related Posts Plugin for WordPress, Blogger...